I’ve put the following guide together to explain (with pictures) the method that I use for stitching and parking my threads. The method I use is the one which works best for me and may not be the best method for everyone. I think the key with parking is once you understand it then practice; if something doesn’t feel right then experiment and find the right way for you.
[update 19th June 2016: I’ve recorded a 30 minute video showing me parking, hope that also helps, scroll down to watch it]
First I’ll start by explaining that I work in columns down the page working down 10 rows at a time and leaving my thread where it next appears in the column. I will finish the column to the bottom of the page before moving onto the next column. Doing this I work the pages left to right and the columns left to right. I also grid as I go. When I’m preparing a project I’ll grid the page outlines and then before I start a page I’ll add in the vertical gridlines 10 stitches apart. I work this way because I’m too impatient to grid the whole thing at once, I usually just want to get started. Once I’ve completed the column I’ll pull out the gridline that I’ve just stitched up to and use it to grid the next page.
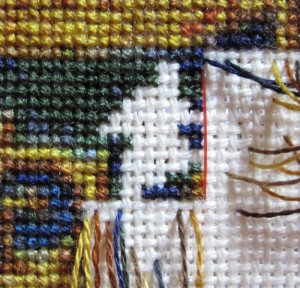
We’ll start with a picture of where I am now.
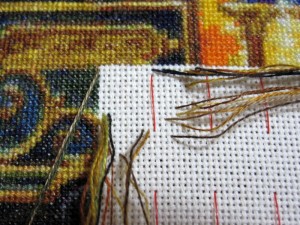
The stitching at the top of the picture is the bottom of the first row of pages, so I’m just starting the page underneath. When I finished that page I parked some of the threads ready for working on this page. Starting with the top row I’ve already got a thread parked in the first hole, I thread this on my needle and then stitch every occurrence of that colour in the ten rows conveniently marked by my red gridding line. (N.B. On this example I’ve got an extra two rows because the page above finished with an eight row block.). Once I’ve finished this colour in this block I’ll check my pattern and find where the colour is used again further down the column.
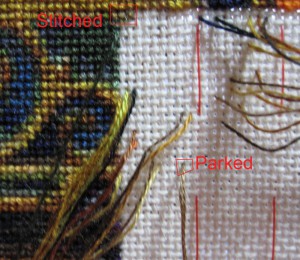
Because I work my stitches from bottom left to top right (so the bottom leg of the cross stitch looks like /) I’ll bring the thread up at the bottom left hole where the next stitch will be. The picture above shows the two stitches I worked in the block and where I have parked the thread ready for the bottom leg of it’s next stitch. Next I’ll be joining in the colour I need for the symbol next to those completed stitches, I use the same needle so I’ll take it off the parked thread and load it up with my new colour. Some people will work with multiple needles and leave their parked threads with the needles still on, I tend to end up poking myself with the needles so I take them off.
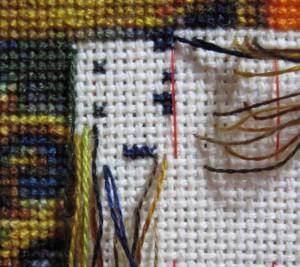
Figure 3 is moving on a bit and I’ve completed the first row in the block. There are now some scattered stitches of the colours that have been added in to complete the first row. One of the colours doesn’t appear in the next two blocks so I fasten off that colour and if I need it again further down I’ll join it in again later. I will only park within the next two blocks because I don’t want to run my thread too far across the back. The whole piece is stitched so there is none of the usual problems with show through but threading too many colours down the back can make it a little bulky. Again this is something where you will need to decide what works best for you, some may only like to park in the next block while others might be happy threading across three or four blocks, you might even park in a block in the next column.
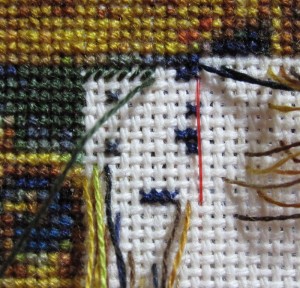
In figure 4 I’ve started on the second row, there’s a few stitches in this colour so the block now begins to fill up nicely.

Normally I would now be joining in the next colour to fill in those gaps but looking at my pattern I can see that colour fills most of the block while the other colours are stitched either side of it. So instead of filling that colour now I’m going to leave it until last and work all of the other colours first.
Now I’ve stitched the other colours I have one colour left to do to complete this block. The reason why I’ve left it until last is because of the back of the work. If I had stitched this big patch of colour first then threads would have been trailed over the stitched area. That doesn’t matter a great deal because you don’t see the back when the picture is completed and framed. But by stitching this area last I’ll be stitching over the trailed threads making sure that they are secured and keeping the back of the work a little neater and the trailed threads less likely to snag.
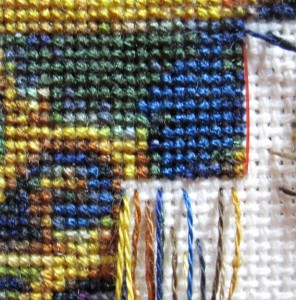
Here we are with the block complete and our threads parked and ready for us in the next block. It’s a lot different to the first row because I’ve now got a lot of threads on the same row ready to be stitched. I don’t think there’s any right or wrong way to decide what thread you’re going to pick up and stitch first. On the first row I used the first thread on the left hand side but when I have a number of threads like this I seem to naturally want to pick up the first colour on the right hand side of the column.
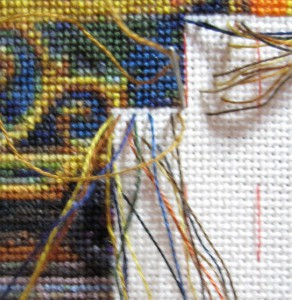
I’m not sure why I prefer to stitch them in this order, it could be because I’m not stitching into the other parked threads although that is something you can’t always avoid especially when you’re working in an area with a lot of colours but as I said at the beginning as you work on parking and become more comfortable with it you’ll find yourself changing the methods to suit your own needs.
I hope this guide has been useful, and if you have any questions or would just like to get in touch, please use the contact form.
Nicola
11 Comments
I am so glad to have found your site, pictures, and explanations. I am wondering, though, are you sometimes working with two threads and sometimes with one thread which will be worked twice for each slant? Thank you again for this helpful guide.
Thankyou so much for this guide. I am just starting on quite a large project and this will definitely come in handy.
Thank you so much for this post!
I’ve read parking guides before, but this is by far the clearest. Your photos are excellent.
Thanks to you I finally understand the method and can’t wait to get started on my first large project.
THANK YOU!
This is the first time I have been close to understanding parking. I get it now! It seems SO much easier than I thought it would be and I will definately be trying this out on my next start. I am normally a cross country kind of girl, and I have 200 stitches left on my current project, spread all over 4 pages of patttern!
[…] Crafty Writer – This blogger does a wonderful parking guide. […]
Hello, thanks for the great info. Do you do your outline stitching at the same time? Or do you go back after and add it in? Any advice would be helpful!
Hi – the very high detail of the (25-28 count) patterns I stitch don’t have any back-stitch… but when I did sewings which required back-stitch I always left that until the very end, to ensure the lines are sharp and sit over the background.
I wasnt sure i was Parking Right but your informative tutorial showed me that i was on the right path. I like hoW you use a temporary strand to mark out your 10×10 section. I was trying to do it with needles bUt they snag my floss when im pulliNg my stitches through. Great tip.!
Nikki, This has been so helpful. I’m wondering, can you tell me what kind of frame stand you are using? it looks like a needlework system 4. Is that what it is? if so, are you using the floor stand with a scroll frame attachment? It looks so easy to flip over from front to back. Thank you so much for your videos.
Wow! I’d never heard of parking before. It’s been a long time since I’ve done any cross stitch, but I’m feeling the itch. I think I’d worry about the thread ends fraying from constantly threading and unthreading the needle. Is that a problem at all?
I am so happy to have seen your parking method on Pinterest. I have never heard of it before. It seems that it should make things easier. I have not stitched in years, but have just ordered a small project and am eager to get started. Thank you so very much for your clever method!